· 2 min read

Ever since we introduced lazy loading cards to Lovelace, getting the card size of a lazy loaded card was hard.

We used to send out an error element before the element was loaded, which would have a getCardSize function. But that would be the wrong size. When the element would be defined we would, fire and rebuild the event so the right card would be recreated.

In 0.110 we stopped doing this, we would give back the correct element, but the element constructor would not be loaded yet, so it doesn't have the getCardSize. When the constructor is loaded, the element will be upgraded and we set the config. From that moment we can call getCardSize.

In this version, we changed the logic for getCardSize so it will wait for this. This means some cards, like stacks, will return a promise because they have to wait for their children to be defined.

If you are a custom card developer and your custom card uses getCardSize to get the size of other cards, you have to adjust it to handle these promises.

Our function to get the card size, which you could copy, now looks like this:

export const computeCardSize = (
card: LovelaceCard | LovelaceHeaderFooter
): number | Promise<number> => {
if (typeof card.getCardSize === "function") {
return card.getCardSize();
}
if (customElements.get(card.localName)) {
return 1;
}
return customElements
.whenDefined(card.localName)
.then(() => computeCardSize(card));
};

We first have the same check as before, if the element has a getCardSize function we will return that value, this should be a number or Promise that resolves to a number.

If the function doesn't exist, we will check if the constructor of the element is registered, if it is, this means the element doesn't have a getCardSize and we will return 1 as we did before.

If the element isn't registered yet, we will wait until it is and then call the same function again of the now defined card to get the size.

· One min read

Ever wondered when implementing entities for our entity integrations why you had to extend BinarySensorDevice and not BinarySensorEntity? Wonder no longer, as we have addressed the situation in Home Assistant 0.110 by renaming all classes that incorrectly had Device in their name. The old classes are still around but will log a warning when used.

All integrations in Home Assistant have been upgraded. Custom component authors need to do the migration themselves. You can do this while keeping backwards compatibility by using the following snippet:

try:
from homeassistant.components.binary_sensor import BinarySensorEntity
except ImportError:
from homeassistant.components.binary_sensor import BinarySensorDevice as BinarySensorEntity

The following classes have been renamed:

Old Class NameNew Class Name
BinarySensorDeviceBinarySensorEntity
MediaPlayerDeviceMediaPlayerEntity
LockDeviceLockEntity
ClimateDeviceClimateEntity
CoverDeviceCoverEntity
VacuumDeviceVacuumEntity
RemoteDeviceRemoteEntity
LightLightEntity
SwitchDeviceSwitchEntity
WaterHeaterDeviceWaterHeaterEntity

· 2 min read

If you are the maintainer of a custom icon set, you might need to update it.

In Home Assistant core version 0.110 we will change the way our icons are loaded. We no longer load all the mdi icons at once, and they will not become DOM elements. This will save us almost 5000 DOM elements and will reduce loading time.

This also means we no longer use or load <ha-iconset-svg>, if your icon set relied on this element, you will have to change your icon set.

We introduced a new API where you can register your custom icon set with an async function, that we will call with the icon name as parameter. We expect a promise with an object of the icon requested. Your icon set can decide on a strategy for loading and caching.

The format of the API is:

window.customIconsets: {
[iconset_name: string]: (icon_name: string) => Promise< { path: string; viewBox?: string } >
};

path is the path of the svg. This is the string that is in the d attribute of the <path> element. The viewBox is optional and will default to 0 0 24 24.

An very simple example of this for the icon custom:icon:

async function getIcon(name) {
return {
path: "M13,14H11V10H13M13,18H11V16H13M1,21H23L12,2L1,21Z",
};
}
window.customIconsets = window.customIconsets || {};
window.customIconsets["custom"] = getIcon;

Home Assistant will call the fuction getIcon("icon") when the icon custom:icon is set.

· One min read

If you are an integration developer and came across the problem of getting the URL of the users' Home Assistant instance, you probably know, this wasn't always easy.

The main problem is that a Home Assistant instance is generally installed, at home. Meaning the internal and external address can be different and even those can have variations (for example, if a user has a Home Assistant Cloud subscription).

Matters become worse if the integration has specific requirements for the URL; for example, it must be externally available and requires SSL.

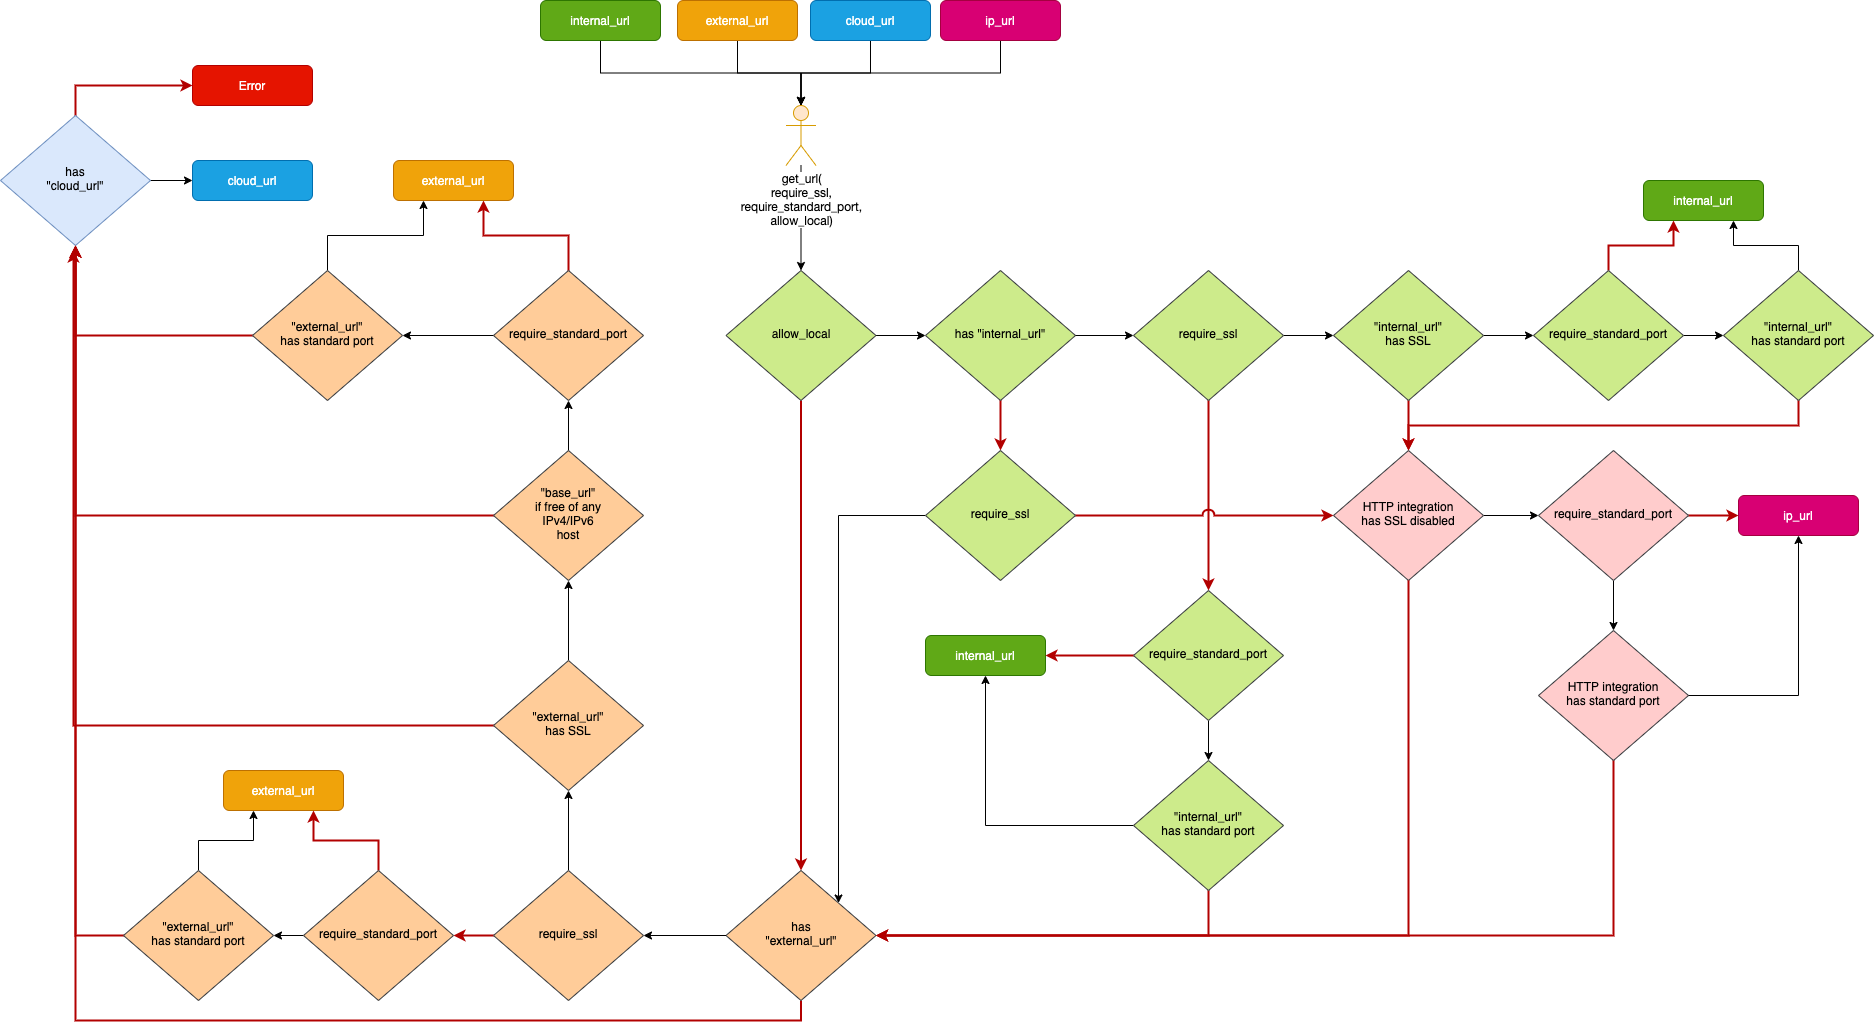
As of Home Assistant Core 0.110, a new instance URL helper is introduced to ease that. We started out with the following flow chart to solve this issue:

Flow chart of getting a Home Assistant instance URL

As a result of this, the previously available base_url is now replaced by two new core configuration settings for the user: the internal and external URL.

From a development perspective, the use of hass.config.api.base_url is now deprecated in favor of the new get_url helper method.

For more information on using and implementing this new URL helper method, consult our documentation here.

· One min read

Recently, Home Assistant started to support images & icons for integrations to show up in the frontend. They look amazing and really brings some color to the UI of Home Assistant.

We got a lot of questions lately on how custom integrations (also known as custom components) can add their images. As of today, that is possible!

HACS icon in the Home Assistant frontend

Created a custom integration? Want the logo & icon for your integration to show up in the Home Assistant frontend? In that case, head over to our GitHub brands repository to add yours!

PS: Did you know you can also add your custom integration to our Python wheels repository? It will make the installation of your custom integration in Home Assistant lightning fast!

· One min read

If you are the author of a custom Lovelace card and use translations, please pay attention as the state translation keys have changed.

Before 0.109, state translations lived under state.<domain>.<state> or state.<domain>.<device class>.<state> for binary sensors. Starting with version 0.109, these translations are now part of the backend and so they have the key format for backend translations. We have standardized the state format to always include a device class. The device class _ is reserved as a fallback for entities without a device class.

OldNew
state.<domain>.<state>component.<domain>.state._.<state>
state.<domain>.<device class>.<state>component.<domain>.state.<device class>.<state>

In future releases, we're planning to migrate state attribute translations to the backend too. We'll publish this on this blog when it happens.

· One min read

Hassfest is an internal tool that we use in Home Assistant to make sure that all integrations have valid data. We've now made Hassfest able to validate any integration, including custom integrations. To make it easy to get started with this, @ludeeus has created a GitHub Action that gets you up and running in less than a minute.

To install it, follow these steps:

  1. Go to your custom component repository on GitHub

  2. Click on "Create new file"

  3. For filename, paste .github/workflows/hassfest.yaml

  4. Paste the following contents:

    name: Validate with hassfest

    on:
    push:
    pull_request:
    schedule:
    - cron: "0 0 * * *"

    jobs:
    validate:
    runs-on: "ubuntu-latest"
    steps:
    - uses: "actions/checkout@v3"
    - uses: home-assistant/actions/hassfest@master

GitHub will now lint all incoming PRs and commits with hassfest, and will also run it once every night to check against the latest requirements.

The Hassfest action will track the beta release channel. That way you will be notified if your integration is incompatible with newer versions of Home Assistant.

· 2 min read

Home Assistant uses a lot of different Docker containers for all kinds of purposes. Not only the Home Assistant Core that is available as Docker containers but also our Supervisor and all add-ons are leveraging Docker.

In many situations, we need to run multiple processes in our containers, that all need to be managed. We used to do this using simple Bash scripting, but quickly learned we need a proper process manager to handle this.

We decided to use the S6 Overlay init system, which is based on the excellent S6 toolset that provides process supervision and management, logging, and system initialization.

The S6 Overlay has been added to our Docker base images, which is used by every Docker image Home Assistant ships.

All containers have been updated, and changes are automatically handled by the Home Assistant Supervisor; For Home Assistant users, there is no noticeable impact.

For users of the Home Assistant Core containers on Docker, this might impact the way you run or start the container. If you run your Home Assistant Core container with an override of the Docker entry point or command, you need to adapt those. For example, some container management systems, like Portainer and Synology, automatically override those for you so you are impacted.

In those cases:

  • The entry point has changed to: /init
  • The command (CMD) has changed to: (Empty/not set)

If you override the command endpoint to start Home Assistant, the init system in the entry point will still be active in the background and a second launch Home Assistant. This can lead to unexpected behavior.

· One min read

We've migrated our translation scripts in the Home Assisstant Core repository under a single namespace. It can now all be invoked using python3 -m script.translations.

Old commandNew command
script/translations_developpython3 -m script.translations develop
script/translations_uploadpython3 -m script.translations upload
script/translations_downloadpython3 -m script.translations download
script/translations_cleanpython3 -m script.translations clean

This will help us prepare for our Translations 2.0 effort that will clean up translations and make it scale better.

· 2 min read

We made some changes that can affect custom Lovelace cards in Home Assistant Core 0.106, if you are a custom card developer, please read the following.

Freeze config

We used to give a copy of the configuration to every card because some cards altered the configuration Lovelace passed to them. In 0.105 we stopped doing this because it is not good for performance to create a deep copy for every card. This resulted in some problems because cards were still altering the configuration. In 0.106 we freeze the configuration. This means that a custom card cannot alter the configuration. If it tries to do it anyway, it will throw an exception or fail silently, depending on if it is run in strict mode.

Please check if your custom card still works with 0.106 and make adjustments to not alter the configuration. You can create a copy of the configuration yourself if you need to.

Helper functions

info

We decided to postpone this change until 0.107.

A second change that was made, is that we no longer load all element types by default. We load them when they are needed. This will also help performance but might break your custom card.

We introduced a set of helpers that you can use to create a Lovelace element, these are the same functions Home Assistant uses internally and will always be up to date to the version the user is using. You can use them as follows:

const helpers = await loadCardHelpers();
const element = helpers.createRowElement(config);
element.hass = this.hass;

For more info see https://github.com/home-assistant/frontend/pull/4853